
1.常见技术架构
1.1 单一框架
一个项目,一个工程,导出为一个war包,在一个Tomcat上运行。也叫all in one。单一架构,项目主要应用技术框架为:Spring , SpringMVC , Mybatis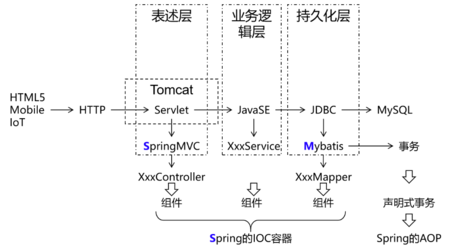
1.2 分布式架构
一个项目(对应 IDEA 中的一个 project),拆分成很多个模块,每个模块是一个 IDEA 中的一个 module。每一个工程都是运行在自己的 Tomcat 上。模块之间可以互相调用。每一个模块内部可以看成是一个单一架构的应用。
分布式架构,项目主要应用技术框架:SpringBoot (SSM), SpringCloud , 中间件等
2.SpringFramework功能
2.1 控制翻转和依赖注入
IoC(Inversion of Control)控制反转
IoC 主要是针对对象的创建和调用控制而言的,也就是说,当应用程序需要使用一个对象时,不再是应用程序直接创建该对象,而是由 IoC 容器来创建和管理,即控制权由应用程序转移到 IoC 容器中,也就是“反转”了控制权。这种方式基本上是通过依赖查找的方式来实现的,即 IoC 容器维护着构成应用程序的对象,并负责创建这些对象。
DI (Dependency Injection) 依赖注入
DI 是指在组件之间传递依赖关系的过程中,将依赖关系在容器内部进行处理,这样就不必在应用程序代码中硬编码对象之间的依赖关系,实现了对象之间的解耦合。在 Spring 中,DI 是通过 XML 配置文件或注解的方式实现的。它提供了三种形式的依赖注入:构造函数注入、Setter 方法注入和接口注入。
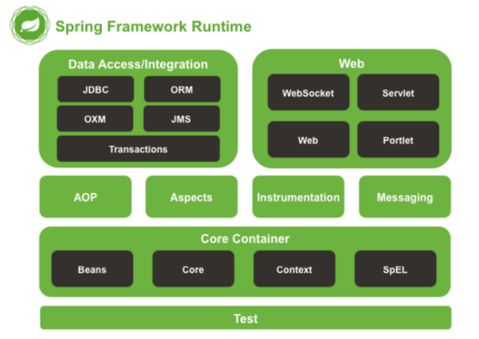
2.2 SpringFramework框架结构图
| 功能模块 | 功能介绍 |
|---|---|
| Core Container | 核心容器,在 Spring 环境下使用任何功能都必须基于 IOC 容器。 |
| AOP&Aspects | 面向切面编程 |
| TX | 声明式事务管理。 |
| 功能模块MVC | 功能介绍提供了面向Web应用程序的集成功能。 |
2.3 SpringIOC容器结构和实现类
BeanFactory 接口提供了一种高级配置机制,能够管理任何类型的对象,它是SpringIoC容器标准化超接口!
ApplicationContext 是 BeanFactory 的子接口。它扩展了以下功能:
- 更容易与 Spring 的 AOP 功能集成
- 消息资源处理(用于国际化)
- 特定于应用程序给予此接口实现,例如Web 应用程序的
WebApplicationContext
简而言之, BeanFactory 提供了配置框架和基本功能,而 ApplicationContext 添加了更多特定于企业的功能。 ApplicationContext 是 BeanFactory 的完整超集
ApplicationContext容器实现类:
| 类型名 | 简介 |
|---|---|
| ClassPathXmlApplicationContext | 通过读取类路径下的 XML 格式的配置文件创建 IOC 容器对象 |
| FileSystemXmlApplicationContext | 通过文件系统路径读取 XML 格式的配置文件创建 IOC 容器对象 |
| AnnotationConfigApplicationContext | 通过读取Java配置类创建 IOC 容器对象 |
| WebApplicationContext | 专门为 Web 应用准备,基于 Web 环境创建 IOC 容器对象,并将对象引入存入 ServletContext 域中。 |
2.4 SpringIoC 容器配置管理方式
Spring框架提供了多种配置方式:XML配置方式、注解方式和Java配置类方式
- XML配置方式:是Spring框架最早的配置方式之一,通过在XML文件中定义Bean及其依赖关系、Bean的作用域等信息,让Spring IoC容器来管理Bean之间的依赖关系。该方式从Spring框架的第一版开始提供支持。
- 注解方式:从Spring 2.5版本开始提供支持,可以通过在Bean类上使用注解来代替XML配置文件中的配置信息。通过在Bean类上加上相应的注解(如@Component, @Service, @Autowired等),将Bean注册到Spring IoC容器中,这样Spring IoC容器就可以管理这些Bean之间的依赖关系。
- Java配置类方式:从Spring 3.0版本开始提供支持,通过Java类来定义Bean、Bean之间的依赖关系和配置信息,从而代替XML配置文件的方式。Java配置类是一种使用Java编写配置信息的方式,通过@Configuration、@Bean等注解来实现Bean和依赖关系的配置。
3.XML方式配置组件管理
3.1 组件信息声明配置IoC
- 创建Maven工程,导入SpringIoC相关依赖
<dependencies>
    <!--spring context依赖-->
    <!--当你引入Spring Context依赖之后,表示将Spring的基础依赖引入了-->
    <dependency>
        <groupId>org.springframework</groupId>
        <artifactId>spring-context</artifactId>
        <version>6.0.6</version>
    </dependency>
    <!--junit5测试-->
    <dependency>
        <groupId>org.junit.jupiter</groupId>
        <artifactId>junit-jupiter-api</artifactId>
        <version>5.3.1</version>
    </dependency>
</dependencies>
xml配置文件编写(resources/spring-bean-01.xml)
<bean id="happyComponent" class="com.atguigu.ioc.HappyComponent"/>- bean标签:通过配置bean标签告诉IOC容器需要创建对象的组件信息
- id属性:bean的唯一标识,方便后期获取Bean,自己取名
- class属性:组件类的全限定符,目录.组件名
- 注意:要求当前组件类必须包含无参数构造函数
基于静态工厂方法实例化
组件类:
public class ClientService {
  private static ClientService clientService = new ClientService();
  private ClientService() {}

  public static ClientService createInstance() {

    return clientService;
  }
}
xml配置编写:
<bean id="clientService" class="examples.ClientService" factory-method="createInstance"/>- factory-method: 指定静态工厂方法,该方法必须是static方法
基于实例工厂(非静态)方法实例化
准备组件类
public class DefaultServiceLocator {

  private static ClientServiceImplclientService = new ClientServiceImpl();

  public ClientService createClientServiceInstance() {
    return clientService;
  }
}
xml配置编写:
<!-- 将工厂类进行ioc配置 --> <bean id="serviceLocator" class="examples.DefaultServiceLocator"> </bean> <!-- 根据工厂对象的实例工厂方法进行实例化组件对象 --> <bean id="clientService" factory-bean="serviceLocator" factory-method="createClientServiceInstance"/>- 非静态工厂:通过factory-bean=“非静态工厂Bean的id”来指定非静态工厂
3.2 bean参数注入
通过构造函数注入,
标签内指定 标签 - 场景1: 多参数,可以按照相应构造函数的顺序注入数据
<beans>
  <bean id="userService" class="x.y.UserService">
    <!-- value直接注入基本类型值 -->
    <constructor-arg  value="18"/>
    <constructor-arg  value="赵伟风"/>
    <constructor-arg  ref="userDao"/>
  </bean>
  <!-- 被引用类bean声明 -->
  <bean id="userDao" class="x.y.UserDao"/>
</beans>
场景2: 多参数,可以按照相应构造函数的名称注入数据
<beans> <bean id="userService" class="x.y.UserService"> <!-- value直接注入基本类型值 --> <constructor-arg name="name" value="赵伟风"/> <constructor-arg name="userDao" ref="userDao"/> <constructor-arg name="age" value="18"/> </bean> <!-- 被引用类bean声明 --> <bean id="userDao" class="x.y.UserDao"/> </beans>- 场景3: 多参数,可以按照相应构造函数的角标注入数据,index从0开始 构造函数(0,1,2....)
<beans> <bean id="userService" class="x.y.UserService"> <!-- value直接注入基本类型值 --> <constructor-arg index="1" value="赵伟风"/> <constructor-arg index="2" ref="userDao"/> <constructor-arg index="0" value="18"/> </bean> <!-- 被引用类bean声明 --> <bean id="userDao" class="x.y.UserDao"/> </beans>- constructor-arg标签:name属性指定参数名,value用于指定普通类型,ref用于指定组件名字
通过setter方法依赖注入,
标签内指定 标签 <bean id="simpleMovieLister" class="examples.SimpleMovieLister"> <!-- setter方法setMovieFinder,注入movieFinder对象的标识id name = 属性名 ref = 引用bean的id值--> <property name="movieFinder" ref="movieFinder" /> <!-- setter方法setMovieName,注入基本数据类型movieName name = 属性名 value= 基本类型值--> <property name="movieName" value="消失的她"/> </bean> <bean id="movieFinder" class="examples.MovieFinder"/>- property标签:name属性指定set方法的名字(去掉set,首字母小写),value用于指定普通类型,ref用于指定组件名字
3.3 IoC容器的创建和使用
容器实例化
方式1:实例化并且指定配置文件
//参数:String...locations 传入一个或者多个配置文件
ApplicationContext context =
         new ClassPathXmlApplicationContext("services.xml", "daos.xml");
方式2:先实例化,再指定配置文件,最后刷新容器触发Bean实例化动作 [springmvc源码和contextLoadListener源码方式]
ApplicationContext context =
         new ClassPathXmlApplicationContext();
//设置配置配置文件,方法参数为可变参数,可以设置一个或者多个配置
iocContainer1.setConfigLocations("services.xml", "daos.xml");
//后配置的文件,需要调用refresh方法,触发刷新配置
iocContainer1.refresh();
Bean对象读取
方式1: 根据id获取
//没有指定类型,返回为Object,需要类型转化! HappyComponent happyComponent = (HappyComponent) iocContainer.getBean("bean的id标识"); //使用组件对象 happyComponent.doWork();- 方式2:根据类型获取,但是要求,同类型(当前类,或者之类,或者接口的实现类)只能有一个对象交给IoC容器管理
//配置两个或者以上出现: org.springframework.beans.factory.NoUniqueBeanDefinitionException 问题
HappyComponent happyComponent = iocContainer.getBean(HappyComponent.class);
happyComponent.doWork();
根据类型来获取bean时,在满足bean唯一性的前提下,其实只是看:『对象 instanceof 指定的类型』的返回结果,
只要返回的是true就可以认定为和类型匹配,能够获取到。- 方式3: 根据id和类型获取
HappyComponent happyComponent = iocContainer.getBean("bean的id标识", HappyComponent.class);
happyComponent.doWork();
3.4 组件的生命周期方法配置
我们可以在组件类中定义方法,然后当IoC容器实例化和销毁组件对象的时候进行调用。这两个方法我们成为生命周期方法。
public class BeanOne {

  //周期方法要求: 方法命名随意,但是要求方法必须是 public void 无形参列表
  public void init() {
    // 初始化逻辑
  }
}

public class BeanTwo {

  public void cleanup() {
    // 释放资源逻辑
  }
}
在xml文件中进行周期方法配置,指定初始化方法和销毁方法
<beans>
  <bean id="beanOne" class="examples.BeanOne" init-method="init" />
  <bean id="beanTwo" class="examples.BeanTwo" destroy-method="cleanup" />
</beans>
3.5 组件作用域
在IoC容器中,这些<bean>标签对应的信息转成Spring内部 BeanDefinition 对象,BeanDefinition 对象内,包含定义的信息(id,class,属性等等),BeanDefinition与类概念一样,SpringIoC容器可以可以根据BeanDefinition对象反射创建多个Bean对象实例。
具体创建多少个Bean的实例对象,由Bean的作用域Scope属性指定!
| 取值 | 含义 | 创建对象的时机 | 默认值 |
|---|---|---|---|
| singleton | 在 IOC 容器中,这个 bean 的对象始终为单实例 | IOC 容器初始化时 | 是 |
| prototype | 这个 bean 在 IOC 容器中有多个实例 | 获取 bean 时 | 否 |
如果是在WebApplicationContext环境下还会有另外两个作用域(但不常用)
| 取值 | 含义 | 创建对象的时机 | 默认值 |
|---|---|---|---|
| request | 请求范围内有效的实例 | 每次请求 | 否 |
| session | 会话范围内有效的实例 | 每次会话 | 否 |
3.6 FactoryBean
4.XML+注解方式配置组件
4.1 注解的配置及使用方法
1.添加注解,可以通过@Component(value='')指定类的id,以便获取时用,默认值为类名首字母小写
@Component(value = "myStudent")等同于 \<bean id = "myStudent" class="com.apps.pojo.Student" />
| 注解 | 说明 |
|---|---|
| @Component | 该注解用于描述 Spring 中的 Bean,它是一个泛化的概念,仅仅表示容器中的一个组件(Bean),并且可以作用在应用的任何层次,例如 Service 层、Dao 层等。 使用时只需将该注解标注在相应类上即可。 |
| @Repository | 该注解用于将数据访问层(Dao 层)的类标识为 Spring 中的 Bean,其功能与 @Component 相同。 |
| @Service | 该注解通常作用在业务层(Service 层),用于将业务层的类标识为 Spring 中的 Bean,其功能与 @Component 相同。 |
| @Controller | 该注解通常作用在控制层(如SpringMVC 的 Controller),用于将控制层的类标识为 Spring 中的 Bean,其功能与 @Component 相同。 |
2.编写xml配置文件,扫描包
<?xml version="1.0" encoding="UTF-8"?>
<beans xmlns="http://www.springframework.org/schema/beans"
       xmlns:xsi="http://www.w3.org/2001/XMLSchema-instance"
       xmlns:context="http://www.springframework.org/schema/context"
       xsi:schemaLocation="http://www.springframework.org/schema/beans http://www.springframework.org/schema/beans/spring-beans.xsd http://www.springframework.org/schema/context https://www.springframework.org/schema/context/spring-context.xsd">
    <!-- 配置自动扫描的包 -->
    <!-- 1.包要精准,提高性能!
         2.会扫描指定的包和子包内容
         3.多个包可以使用,分割 例如: com.atguigu.controller,com.atguigu.service等
    -->
    <context:component-scan base-package="com.atguigu.components"/>

</beans>
可以排除指定组件
- context:exclude-filter标签:指定排除规则
- type属性:指定根据什么来进行排除,annotation取值表示根据注解来排除
- expression属性:指定排除规则的表达式,对于注解来说指定全类名即可
<context:component-scan base-package="com.atguigu.components">
    <context:exclude-filter type="annotation" expression="org.springframework.stereotype.Controller"/>
</context:component-scan>
指定扫描组件
<!-- 仅扫描 = 关闭默认规则 + 追加规则 -->
<!-- use-default-filters属性:取值false表示关闭默认扫描规则 -->
<context:component-scan base-package="com.atguigu.ioc.components" use-default-filters="false">

    <!-- context:include-filter标签:指定在原有扫描规则的基础上追加的规则 -->
    <context:include-filter type="annotation" expression="org.springframework.stereotype.Controller"/>
</context:component-scan>
3.获取bean,仍然通过xml方式
public class ControllerTest {

    @Test
    public  void testRun(){
        ApplicationContext applicationContext =
                new ClassPathXmlApplicationContext("spring-ioc.xml");
        StudentController studentController = applicationContext.getBean(StudentController.class);
        studentController.findAll();
    }
}
4.2 注解配置周期方法及作用域
@PostConstruct //注解制指定初始化方法
@PreDestroy //注解指定销毁方法
public class BeanOne {

  //周期方法要求: 方法命名随意,但是要求方法必须是 public void 无形参列表
  @PostConstruct  //注解制指定初始化方法
  public void init() {
    // 初始化逻辑
  }
}

public class BeanTwo {

  @PreDestroy //注解指定销毁方法
  public void cleanup() {
    // 释放资源逻辑
  }
}
作用域:
通过@Scope注解配置
@Scope(scopeName = ConfigurableBeanFactory.SCOPE_SINGLETON) //单例,默认值
@Scope(scopeName = ConfigurableBeanFactory.SCOPE_PROTOTYPE) //多例  二选一
public class BeanOne {

  //周期方法要求: 方法命名随意,但是要求方法必须是 public void 无形参列表
  @PostConstruct  //注解制指定初始化方法
  public void init() {
    // 初始化逻辑
  }
}
4.3 通过注解进行注入
1.前提
- 参与自动装配的组件(需要装配、被装配)全部都必须在IoC容器中。
- xml和注解方式都可以
2.@Autowired注解
可以在成员变量、构造器、set方法上使用
@Autowired
private SoldierDao soldierDao;
@Autowired public SoldierController(SoldierService soldierService) { this.soldierService = soldierService;@Autowired public void setSoldierService(SoldierService soldierService) { this.soldierService = soldierService; }工作流程
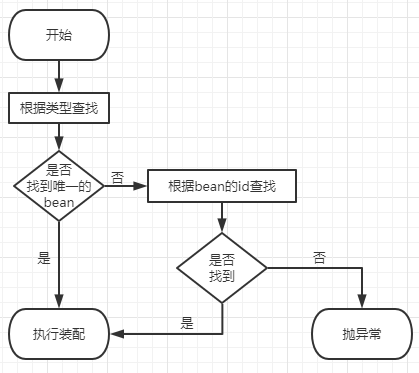
若Bean不唯一
1.有@Qualifier(value='') 注解:根据 @Qualifier 注解中指定的名称作为 bean 的id进行匹配,找不到则失败
2.没有@Qualifier()注解,根据@Autowired 标记位置成员变量的变量名作为 bean 的 id 进行匹配
3.@Resource注解
- @Resource注解用在属性上、setter方法上
- Resource注解属于JDK扩展包,所以不在JDK当中,需要额外引入以下依赖(高于JDK11或低于JDK8需要引入以下依赖)
<dependency>
    <groupId>jakarta.annotation</groupId>
    <artifactId>jakarta.annotation-api</artifactId>
    <version>2.1.1</version>
</dependency>- @Resource(name='test') == @Autowired + @Qualifier(value='test')
4.@Value注解,通常用于注入外部化属性
1.在application.properties中声明外部配置
catalog.name=MovieCatalog2.xml引入外部配置
<context:property-placeholder location="application.properties" />3.@Value注解读取配置
/**
     * 情况1: ${key} 取外部配置key对应的值!
     * 情况2: ${key:defaultValue} 没有key,可以给与默认值
     */
@Value("${catalog:hahaha}")
private String name;
5.配置类方式管理Bean
5.1 配置类和扫描注解
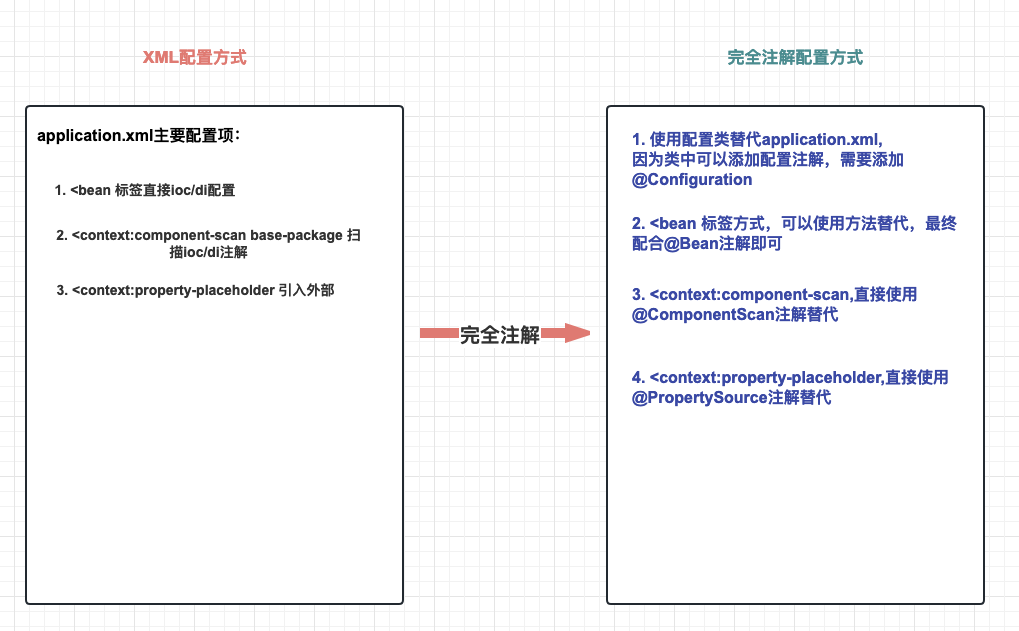
- @Configuration指定一个类为配置类,可以添加配置注解,替代配置xml文件
- @ComponentScan(basePackages = {"包","包"}) 替代<context:component-scan标签实现注解扫描
- @PropertySource("classpath:配置文件地址") 替代 <context:property-placeholder标签
//标注当前类是配置类,替代application.xml
@Configuration
//使用注解读取外部配置,替代 <context:property-placeholder标签
@PropertySource("classpath:application.properties")
//使用@ComponentScan注解,可以配置扫描包,替代<context:component-scan标签
@ComponentScan(basePackages = {"com.atguigu.components"})
public class MyConfiguration {

}
创建IoC容器
方式一
// AnnotationConfigApplicationContext 根据配置类创建 IOC 容器对象
ApplicationContext iocContainerAnnotation =
new AnnotationConfigApplicationContext(MyConfiguration.class);
方式二
// AnnotationConfigApplicationContext-IOC容器对象
ApplicationContext iocContainerAnnotation =
new AnnotationConfigApplicationContext();
//外部设置配置类
iocContainerAnnotation.register(MyConfiguration.class);
//刷新后方可生效!!
iocContainerAnnotation.refresh();
5.2 @Bean定义组件
第三方jar包的类,添加到ioc容器,无法使用@Component等相关注解!因为源码jar包内容为只读模式!
xml方式实现:
<?xml version="1.0" encoding="UTF-8"?>
<beans xmlns="http://www.springframework.org/schema/beans"
       xmlns:xsi="http://www.w3.org/2001/XMLSchema-instance"
       xmlns:context="http://www.springframework.org/schema/context"
       xsi:schemaLocation="http://www.springframework.org/schema/beans http://www.springframework.org/schema/beans/spring-beans.xsd http://www.springframework.org/schema/context https://www.springframework.org/schema/context/spring-context.xsd">


    <!-- 引入外部属性文件 -->
    <context:property-placeholder location="classpath:jdbc.properties"/>

    <!-- 实验六 [重要]给bean的属性赋值:引入外部属性文件 -->
    <bean id="druidDataSource" class="com.alibaba.druid.pool.DruidDataSource">
        <property name="url" value="${jdbc.url}"/>
        <property name="driverClassName" value="${jdbc.driver}"/>
        <property name="username" value="${jdbc.user}"/>
        <property name="password" value="${jdbc.password}"/>
    </bean>

</beans>
通过@Bean注解替换<bean/>
//标注当前类是配置类,替代application.xml
@Configuration
//引入jdbc.properties文件
@PropertySource({"classpath:application.properties","classpath:jdbc.properties"})
@ComponentScan(basePackages = {"com.atguigu.components"})
public class MyConfiguration {

    //默认方法的名字===bean id,可以通过@Bean("")指定Bean的名字
    //解决方案: 配置类方式,可以使用方法返回值+@Bean注解
    @Bean
    public DataSource createDataSource(@Value("${jdbc.user}") String username,
                                       @Value("${jdbc.password}")String password,
                                       @Value("${jdbc.url}")String url,
                                       @Value("${jdbc.driver}")String driverClassName){
        //使用Java代码实例化
        DruidDataSource dataSource = new DruidDataSource();
        dataSource.setUsername(username);
        dataSource.setPassword(password);
        dataSource.setUrl(url);
        dataSource.setDriverClassName(driverClassName);
        //返回结果即可
        return dataSource;
    }
}
5.3 引用其他ioc组件
在一个 @Bean 方法中直接调用其他 @Bean 方法来获取 Bean 实例,虽然是方法调用,也是通过IoC容器获取对应的Bean
@Configuration
public class JavaConfig {

    @Bean
    public HappyMachine happyMachine(){
        return new HappyMachine();
    }

    @Bean
    public HappyComponent happyComponent(){
        HappyComponent happyComponent = new HappyComponent();
        //直接调用方法即可!
        happyComponent.setHappyMachine(happyMachine());
        return happyComponent;
    }

}
通过方法参数传递 Bean 实例的引用来解决 Bean 实例之间的依赖关系
@Configuration
public class JavaConfig {

    @Bean
    public HappyMachine happyMachine(){
        return new HappyMachine();
    }

    /**
     * 可以直接在形参列表接收IoC容器中的Bean!
     *    情况1: 直接指定类型即可
     *    情况2: 如果有多个bean,(HappyMachine 名称 ) 形参名称等于要指定的bean名称!
     *           例如:
     *               @Bean
     *               public Foo foo1(){
     *                   return new Foo();
     *               }
     *               @Bean
     *               public Foo foo2(){
     *                   return new Foo()
     *               }
     *               @Bean
     *               public Component component(Foo foo1 / foo2 通过此处指定引入的bean)
     */
    @Bean
    public HappyComponent happyComponent(HappyMachine happyMachine){
        HappyComponent happyComponent = new HappyComponent();
        //赋值
        happyComponent.setHappyMachine(happyMachine);
        return happyComponent;
    }

}
5.4 @Import注解
@Import 注释允许一个配置类从另一个配置类加载 @Bean 定义,
@Configuration
public class ConfigA {

  @Bean
  public A a() {
    return new A();
  }
}

@Configuration
@Import(ConfigA.class)
public class ConfigB {

  @Bean
  public B b() {
    return new B();
  }
}
在实例化时只需提供ConfigB即可
5.5 注解写法实例
配置类
@Configuration
@ComponentScan(basePackages = "com.atguigu")
@PropertySource("classpath:jdbc.properties")
public class JavaConfig {

    @Value("${atguigu.url}")
    private String url;
    @Value("${atguigu.driver}")
    private String driver;
    @Value("${atguigu.username}")
    private String username;
    @Value("${atguigu.password}")
    private String password;

    @Bean(destroyMethod = "close")
    public DruidDataSource dataSource(){
        DruidDataSource dataSource = new DruidDataSource();
        dataSource.setUrl(url);
        dataSource.setDriverClassName(driver);
        dataSource.setUsername(username);
        dataSource.setPassword(password);
        return dataSource;
    }

    @Scope(ConfigurableBeanFactory.SCOPE_PROTOTYPE)
    @Bean
    public JdbcTemplate jdbcTemplate(DataSource dataSource){
        JdbcTemplate jdbcTemplate = new JdbcTemplate();
        jdbcTemplate.setDataSource(dataSource);
        return jdbcTemplate;
    }

}
主类
public class ControllerTest {

    @Test
    public  void testRun(){

        AnnotationConfigApplicationContext applicationContext =
                new AnnotationConfigApplicationContext(JavaConfig.class);

        StudentController studentController = applicationContext.getBean(StudentController.class);

        studentController.findAll();

    }
}
6.整合Spring5-Test5测试环境
整合测试环境的作用:
- 不需要自己创建IOC容器对象了
- 任何需要的bean都可以在测试类中直接享受自动装配
导入相关依赖
<!--junit5测试-->
<dependency>
    <groupId>org.junit.jupiter</groupId>
    <artifactId>junit-jupiter-api</artifactId>
    <version>5.3.1</version>
</dependency>
<dependency>
    <groupId>org.springframework</groupId>
    <artifactId>spring-test</artifactId>
    <version>6.0.6</version>
    <scope>test</scope>
</dependency>
整合测试注解使用
//@SpringJUnitConfig(locations = {"classpath:spring-context.xml"})  //指定配置文件xml文件或配置类
@SpringJUnitConfig(value = {BeanConfig.class})  //指定配置类
public class Junit5IntegrationTest {

    @Autowired
    private User user;

    @Test
    public void testJunit5() {
        System.out.println(user);

     //原写法
    //1.获取ioc容器
        //2.获取组件
        //3.使用组件
    }
}